Self Stick Vinyl Floor Tiles
 Most self stick floor tiles are made out of vinyl. These self stick vinyl floor tiles provide you a perfect inexpensive option for kitchen, bathroom, and entrance-way flooring. Vinyl tiles have a high-made quality and they can for the most part imitate the looks of ceramic and stone tiles. Comparatively they are much cheaper and are much easier and quicker to install. It is so easy to install vinyl flooring tiles that you can do the job without any great amount of knowledge about tile installation. To begin with you will require certain tools and accessories to perform the job of tile installation like sandpaper, floor filler, cleaner, correct quantity of self-stick vinyl tiles, tile roller, utility knife, measuring tape and chalk.
The first Step is to remove the old flooring present, if necessary as the self-stick vinyl tiles can be laid over dry concrete, undamaged vinyl and linoleum or plywood surface. You can put a plywood surface over the existing damaged floor, if you feel that it is necessary to get a true surface.
Now you should fill and sand any nail holes, cracks or low spots in the floor to obtain a true surface. Check and remove any bumps in the floor with a chisel or sandpaper whichever you see fit.
Now proceed to fill low spots in the floor or textured vinyl using a commercial grade leveler. Next you should clean the floor to remove all dirt and grease from the floor and remove any glossy surface or adhesive with the appropriate commercial products available in the market.
To lay the new floor using the self stick flooring tiles, you have to make sure that you store the new self-stick vinyl tiles inside your house 24 to 48 hours before the time of fixing them. This is very important because it will ensure the adhesive gets acclimated to the proper temperature in your house. Your next step would be to find the center of the place where you want to lay the new tiles by measuring the center of each wall and drawing a chalk line between the opposing walls.
Now just lay a row of tiles to each wall from the center chalk line cross without removing the paper from the back of the tiles and adjust the center starting point of the tiles so that there is not less than a half tile where the rows meet each of the four walls. Re-draw the chalk line to mark the new starting point.
After you are through this process you may remove the paper backing from the first self-stick vinyl tile in the center starting point and firmly press the tile in place.
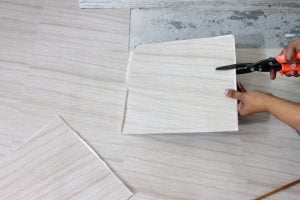
After that, continue laying the tiles in rows from the center of the room to the walls. Always try to be careful to lay the tile edges as close to the last tile as possible for greater durability and a good finish. You can cut the tiles with a sharp utility knife to fit at the end of the row if necessary. You can also use cardboard to make patterns when fitting tiles around difficult shapes.